

By Will Brown
Please note, this modification is only applicable to 1994-1997 Miatas
The exact instructions are for a 1996 Mazda Miata - things might be in slightly different places for other models (and if you have a factory manual, the connector numbers will be different) - but the modification will work!
To date, I have received emails from folks who have successfully modified '95s, '96s and '97s. And of course my own '96. Send me email if you make the mod to your car, I'd love to hear from you!
(July 2001) I've stopped counting, but I've received well over a dozen emails from folks who have easily installed the mod and love it!
This modification DOES NOT APPLY to US Spec 1990-1993 models!!
This modification DOES NOT APPLY to the 1999 Miata, either.
Originally I installed a set of Crazy Red Italian driving lights, so other drivers could see me better. Then I started thinking about sticking some fairly powerful lights down in the mouth of my Miata, which would be something you couldn't run all the time. I also didn't think I wanted two sets of driving lights in the mouth of the car either. Enter the Canadian Spec Miata - it has daytime running lights "built in" - they use the front turn/marker assembly as a DRL. Basically, when your headlights are not on, and the key is turned "ON", the front turn signal filaments are on - the real bright orange ones that come on when you use your turn signal. Here is how the 1996 factory shop manual describes it:
The DRL operate with the engine running and the following switches off:
    1. Headlight switch
    2. Turn switch
    3. Hazard warning switch
    4. Parking brake switch (parking brake released)
NOTE: DRLs do not operate with parking brake on!! Chances are you'll test out the setup in your driveway or garage-mahal by simply turning the key on - don't forget to throw the car in gear (engine off and chock the wheels!) and release the parking brake in order to see how things are working
The great thing about this modification is that it take only a minute or so (literally 60 seconds!) is totally
reversible, and uses factory everything. Here's why: Rather than make different wiring harnesses for different spec cars (US spec & Canadian spec, for example) they use the same harness, which is a superset or combination of the different requirements. In the US, a shorting plug is used, and the DRL module is not used. In Canada, just the opposite - they don't use the shorting plug, and install a DRL module. So, all you have to do is:
- Get a Canadian DRL module
- Crawl under the dash
- Unplug the shorting plug (X-32)
- Plug in (and mount) the DRL module (E-11)
That's it! There is a mounting stud/bolt already in the car to hold the DRL module
(but you need to get a nut ahead of time to hold it in tightly - it can dangle
pretty much out of the way, but I would recommend procuring the proper nut and
securing the DRL module in its prescribed place).
(July 2001) I recently received an email from an enthusiast who supplied the
following information about the required nut:
The nut that fit my '96 is a 6mm nut (bolt-thread diameter) with a
standard (1.0 pitch) thread.  [It] fit a 10mm wrench (I suppose
different brands could use a different size hex).
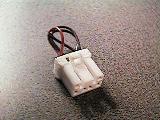
So, here is what the DRL module I keep talking about looks like:
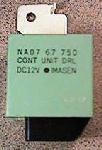
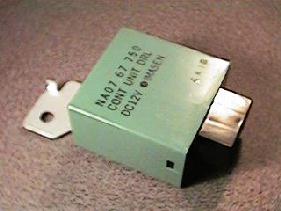
The unit is pretty small, just a few cubic inches...
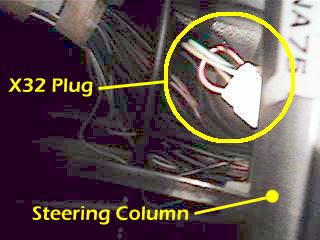
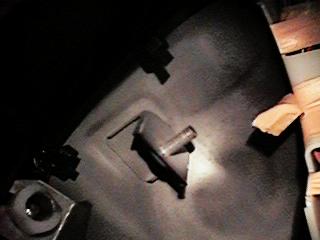
Here is where the plugs are located in the dash:
 Click here for a full sized pic
So, looking up from the brake pedal, you can see the plug that needs to come out...
NOTES:
- If your Miata has an alarm system (especially factory installed) the alarm module may hide this plug. If you see a box tie-wrapped to the harnesses under the dash, try moving it around to see behind it... (known problem with 97M)
- Someone told me on their 95 they had to remove the steering column cover to gain access to X32
...and looking up from the gas pedal, you see the plug for the DRL module...
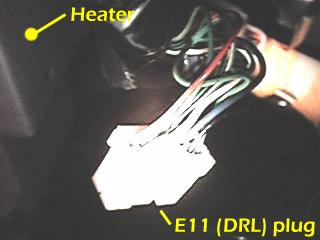
...and here is the stud/bolt already in place, ready to mount the DRL module.
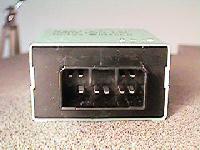
So you unplug the shorting plug, which looks like this:
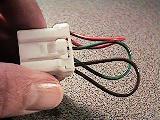
The wire colors are red, green and brown (all solid)
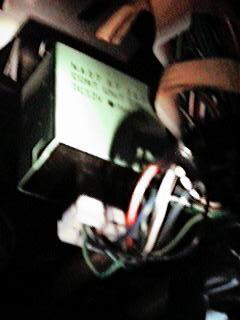
Then you plug in the DRL module, fit it over the mounting stud, and bolt it down. Here is a (fuzzy) pic of the DRL module plugged up and bolted in:
PERFORMANCE
I personally love the modification - allows the car to be seen, without having to pop up the barn-door headlights, or add aftermarket lights in the mouth of the car.
I have had two folks so far, without prompting, tell me that the DRL mod was as bright or brighter than the 55W halogen driving/fog lamps I was running in the mouth of the car at the time.
It makes sense, because the turn signal lens was designed to be seen - not to emit light with which to see. They are also higher than lights in the mouth, and have more illuminated area. Most "projector" lamps have a relatively small aperture, and if not looking at them
pretty much straight on, they may not appear so bright.
Tips
When the OEM front turn signal bulbs blow (and they will,
somewhat soon with the DRL mod) get auto-parts store replacements (Sylvania,
etc) and replace both bulbs at the same time. The replacement bulbs will last
"forever" compared to OEM (and probably cheaper, too).
ORDERING INFORMATION
The DRL module is Mazda Part Number NA07-67-750A, and can be purchased in the USA from
Trussville Mazda for about $120US.
| Back to the Garage |
Last Update:
22 February, 2010
|