This is how to get a "flash to pass" feature on '93 and earlier Miatas. '94 and '95 models implemented an inferior system from the factory that keeps the headlights up for 3 seconds before lowering them.
Editor's note: the above instructions are from the male connector perspective. Mitch worked with the female side of the connector. Hopefully this will clarify things a bit.
Fm: Mitch Toll 70324.2406@CompuServe.com
I've just done the "flash to pass" diode installation and am pleased with the results, but I did manage to screw up the installation before I got it right. And, while it probably takes a lunkhead like me to make this goof, there may be others out there.
When I looked under the dash, there was the white connector, looking just like the gif on Miata.net. Almost. The wires weren't quite right. There was the W/B just where it should have been, but the R/W was actually R/G. Oh well, I thought, close enough, they must have changed wire colors between model years (mine's a '93B). I plugged in the diode, checking polarity, and the lights popped up and lit without my touching the lighting stalk. They stayed up and on.
I waited a few seconds and pulled the diode. Ouch! The diode must have been pulling the current to drive the headlight relay because it had heated to within a few degrees of incandescence.
It took me a while to figure out my screw-up. That gif refers to the other half of that connector - the side you can't see without a mirror or a chiropractor. There was the R/W alright. But why not give directions for connecting the leads on the side of the connector that's easy to see? The appropriate wires are then R/Y and R/W I believe and located catty-corner to those indicated in the gif. This is what I did and it works fine. Electrically, it's identical, but just easier to do and, to my thick head at least, more logical. At least, you might caution people to make sure they're working on the correct side of the connector.
Don't mean to whine, but I think this could help some folks and maybe save you some future hassles. And please keep up the great work. Miata.net is an invaluable resource.
-Mitch
Ken Yarrow replies to Mitch:
I just finished the mod on my '93 LE and was confused about the "sides" of the connector.
I was too lazy to remove the panel under the steering wheel, so I just wiggled under the dash (all 250lbs. of me), feet over the seat, and found the connector. The wires are as shown in the .gif. I put the diode in, pulled on the stalk and listened as the lights went up & down. As I was extricating myself I remembered that the diode was about 1/2" out from the connector. "Better put some tape on it", I thought. So I got the screwgun and removed the panel. WHALA, there was the connector just as you described. I left the diode in place and put some tape on it to hold it in position.
So if you're a contortionist use the .gif. If your smart do it the easy way you describe. Hope this clears up any confusion. By the way, it works great and now I can flash the other Miatas I see. Cool.
All The Best,
Ken Yarrow miataman93@hotmail.com
When you take down the panel under the steering wheel, the connector should really be the only one you can see with out getting under the dash; it was right behind the panel on my LE.
The advantage to taking down the panel is that you can get to the correct side of the connector. If you are on your back under the steering wheel, the correct side is away from you. If you are not under the dash then the correct side is the one closest to you and will resemble the diagram. It was white on my car but some may be green as the description states. The shape was the same. The other conn's were up farther behind the steering column.
From: ward.rosin@actc.ab.ca
Subject: "Flash to pass" feature on '93 or earlier Canadian models
Based on the directions I saw on miata.net, I set up a "flash to pass" feature on my '92 Canada-Spec'd car.
The wiring is complicated somewhat by the DRL (daytime running lights) module so it's easier to make the mod right near the switch in the steering column. Here is how I did it:
           ----------------
           |              |
     -------------        |
     |G/O|W/R| * |        ----#|###---|   <- 2500mA diode
     -------------                    |
     |W/L|R/B|R/W|                    |
     -------------                    |
               |                      |
               ------------------------
(Ward) Rosin - not responsible for errors or omissions (although I
will still feel bad) `
92 Silver - And no, it doesn't need a name!
When you pull the indicator stalk back on early model MX5's with the lights turned off nothing happens. This cheap and easy mod allows for an amazing event. After installing a 60 cent diode and you pull back on the indicator stalk your headlights come up on high beam and immediately close again, ie wink your headlights. Very handy for signalling to pass or just to say 'hello' to a friend.
 Go
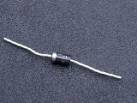
to Radio Parts in Spencer Street Melbourne and purchase a diode. Its is a 3
amp at 1kv. Part number 1N 5408. The cost is less than $1. It looks like
this.
Go
to Radio Parts in Spencer Street Melbourne and purchase a diode. Its is a 3
amp at 1kv. Part number 1N 5408. The cost is less than $1. It looks like
this.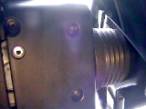 Remove
the cowl from the steering column. There are 4 screws underneath that have
to be removed. When the screws are removes then pry open the plastic cowl
using a kitchen knife.
Remove
the cowl from the steering column. There are 4 screws underneath that have
to be removed. When the screws are removes then pry open the plastic cowl
using a kitchen knife.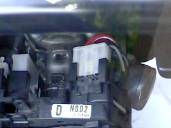 There
is a white plastic connector box located at the top right hand side of the
steering column.
There
is a white plastic connector box located at the top right hand side of the
steering column.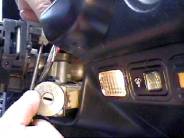 It
is removed by pushing up the holding clip with a screw driver from below.
You will see what I mean when you are doing it.
It
is removed by pushing up the holding clip with a screw driver from below.
You will see what I mean when you are doing it.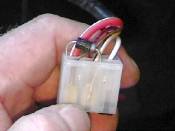 Bend
the diode in a U shape and slide the legs down into the gaps beside the
existing wires in the white plastic holder. The striped side of the diode
MUST be to the side of the diode that goes to the White/Black wire.
Keep the legs of the diode on the outer side so that you can see them
through the case. It is a very snug fit so a small amount of force is
needed.
Bend
the diode in a U shape and slide the legs down into the gaps beside the
existing wires in the white plastic holder. The striped side of the diode
MUST be to the side of the diode that goes to the White/Black wire.
Keep the legs of the diode on the outer side so that you can see them
through the case. It is a very snug fit so a small amount of force is
needed.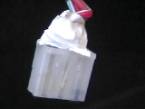 Now
tape over the exposed wires and replace the connector. All done. Now you can
flash to pass.
Now
tape over the exposed wires and replace the connector. All done. Now you can
flash to pass.I discovered that if you replace the '94-97 multi-function switch with one from a '90-93 it will work with the diode trick and you'll end up with the 'bounce' where the headlights retract immediately after you release the headlight lever. You can try a junkyard or eBay for the multi-function switch (headlight/blinker/wiper). I also found that the popup/hazard light 2-button switch (in the center of the dash) is also compatible from '90-97.