Looking White at You. . .
Aaron Smith
aaron.smith@ucdavis.edu
So you’ve been looking through Moss Motors, MM Marketing, or
some other Miata catalog you might have lying around and you just can’t seem to find
a new toy for your Miata (a.k.a. Big Toy) . If you want something that gives your car a
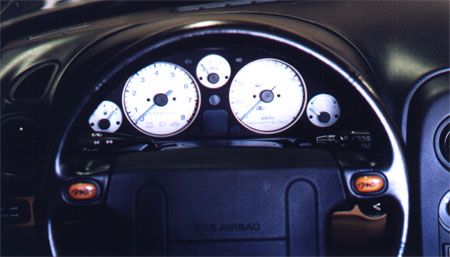
unique look, try a set of white gauge faces. In the interest of going
faster…uh…looking cooler, I helped a club member (Scott) do just that.
For starters, this modification is not for the faint of heart. You
may remember as a kid the first time you disassembled a wind up clock and upon opening it,
all the springs launched into orbit. This isn’t as bad (meaning you actually have a
chance of getting the gauges back together), but it requires working with small fragile
parts that have to be meticulously reassembled. I strongly advise that you read and reread
the directions that come with the gauge faces to make sure you know what’s involved.
Scott bought his gauge faces from Lenny of Metrotec
(707-778-8999).Gauge faces of various colors are available from many places for around
$125. A set usually includes faces for the speedometer, tachometer, fuel level,
temperature, and oil pressure. Depending on the gauge faces that you purchase, the
directions will vary. Rather than going step by step through the installation directions,
here’s an overview of how this installation went:
 It is recommended that you start
with a full tank of gas. This makes the alignment of the needles easier when you put them
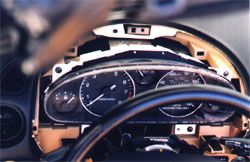
back on. We started by removing the dash pod cover and then the dash pod itself. This was
fairly simple. After removing the clear plastic cover, we reconnected the wiring harnesses
and the speedometer cable. By turning on the ignition (but not starting the car), we could
take careful notes of the positions of the needles. If you aren’t planning to use the
old gauge faces in the future, you might even mark the needle positions on the old faces
with a pencil.
It is recommended that you start
with a full tank of gas. This makes the alignment of the needles easier when you put them
back on. We started by removing the dash pod cover and then the dash pod itself. This was
fairly simple. After removing the clear plastic cover, we reconnected the wiring harnesses
and the speedometer cable. By turning on the ignition (but not starting the car), we could
take careful notes of the positions of the needles. If you aren’t planning to use the
old gauge faces in the future, you might even mark the needle positions on the old faces
with a pencil.
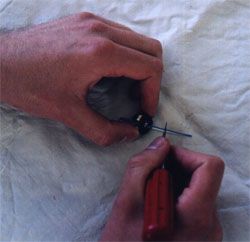
I would recommend that you find a nice clean bench to do the actual
gauge face swap. This will reduce the chances that you could loose a needle or screw. The
next step was to remove the needles. This was rather scary as they are fairly delicate.
Scott has a special tool used by locksmiths that looks a bit like a miniature crowbar. It
worked well for removing the needles without placing a lot of stress on other parts of the
gauge. If you have strong fingers, you can probably pull the needles off with your
fingers.
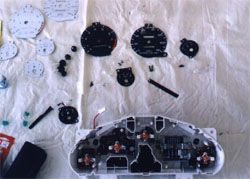
 Since the needles are white, and the
new gauge faces are white, the needles needed to be repainted. Once we had the needles
off, we gently scraped the paint from the back using an X-acto knife. Now the needles can
be repainted in the color of your choice. Make sure that you select a color that contrasts
well in both day and night driving. For example, black would work well for day driving but
would be invisible at night. Most people paint the needles a bright red, but Scott chose a
shade of blue to match the night illumination. Upon completion, we discovered that this
color did not contrast well with the white and Scott is going to repaint the needles a
darker shade of blue.
Since the needles are white, and the
new gauge faces are white, the needles needed to be repainted. Once we had the needles
off, we gently scraped the paint from the back using an X-acto knife. Now the needles can
be repainted in the color of your choice. Make sure that you select a color that contrasts
well in both day and night driving. For example, black would work well for day driving but
would be invisible at night. Most people paint the needles a bright red, but Scott chose a
shade of blue to match the night illumination. Upon completion, we discovered that this
color did not contrast well with the white and Scott is going to repaint the needles a
darker shade of blue.
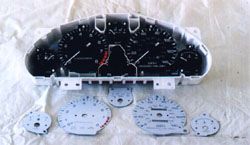 While the needles were drying, we
replaced the gauge faces. Each face is held in place with two screws. The gauge faces are
painted with a very flat and non-reflective paint. If you touch the face, the oils from
your fingers will show up and ruin the appearance of the gauge face.
While the needles were drying, we
replaced the gauge faces. Each face is held in place with two screws. The gauge faces are
painted with a very flat and non-reflective paint. If you touch the face, the oils from
your fingers will show up and ruin the appearance of the gauge face.
The new faces have a protective plastic film over them that
shouldn’t be removed until the faces are in place. Scott found that once the faces
are in place, you can peel off most of the film and then you must loosen the screws to
free the plastic that becomes trapped below.
 Next, we took the dash pod out to
the car, reconnected it, and turned the ignition to on. Without pressing the needles on
completely, Scott placed each needle in place. Since he didn’t press them on all the
way, removal for adjustment was easy. Once we were certain that the needles were in the
right places, we pressed them in place. We had to take the pod out one last time to
install the clear plastic cover. Once everything else was buttoned up, the results were
impressive.
Next, we took the dash pod out to
the car, reconnected it, and turned the ignition to on. Without pressing the needles on
completely, Scott placed each needle in place. Since he didn’t press them on all the
way, removal for adjustment was easy. Once we were certain that the needles were in the
right places, we pressed them in place. We had to take the pod out one last time to
install the clear plastic cover. Once everything else was buttoned up, the results were
impressive.
During the daytime, the gauges look great. They catch your eye as
you walk by the car and they give the gauges a purposeful look. At nighttime, the gauges
appear black with blue numbers. The only downside to this is that the gauges flash white
when you pass under street lamps with the top down. It’s a minor inconvenience at
best. Scott and I both noticed right away that the blue illumination doesn’t quite
look right since everything else in the car is green. One of our next weekend projects
will be to switch the rest of his interior over to blue illumination.
This will be a lot of work, but since we’re working with a
Miata, it will be fun too!
| Back to the Garage |
31 May, 1999 |