
by Russ Rudez
Professional install recommended.
Step 1: Lay the hardtop upside down on a soft blanket or workbench. Use extreme care so you do not scuff to top surface of the top. Remove the (12) 10mm bolts and washers from the latch positions. Starting with the front latches, take note of left and right latches and position them accordingly. On the latches, you will see two guide pins. Now, on the top, you will see Dimples where those guide pins will go. Carefully drill two holes for the guide pins. Once your holes are drilled, bolt the latches in place using the supplied 10mm bolts and lock washers.
Step 2: You will now be installing you latches for the side of the hardtop near the seat belts. Installation is exactly like step 1. The only note is, if you have a roll bar, skip this step until you place the top on the car. The roll bar might make this difficult to set the top in position. If your car has a "style bar" (ie; two chrome hoops) you can go ahead and install these latches.
Step 3: You will now be installing your seals and trim pieces. Start with the drivers side window trim. Take your one piece polished channel (shaped like a curved "L") and attach this to the top using the supplied Phillips head screws. Once you have that in place get your rubber seal and starting at the front edge of the hard top, install two Phillips head screws in the "flap" to secure the seal. Working slowly, one inch at a time, insert the grooved section of the seal into the channel. The, press the middle of the seal and you will feel it "lock" into place. Work all the way down the seal until you come to the bottom and have the "flap" remaining. Just like the front, insert two Phillips head screws to secure the bottom portion of the seal. Passenger side is the same procedure.
Step 4: You will now see the channel that runs along the back of the top. Take your rear weather strip and gently press it into place. Then secure each end using the remaining Phillips head screws. Your top (other than installing your glass window - or Lexan window) is now finished. Leave it on the workbench though, we need to do a few things to the Miata first to get it ready for the new top!!
Step 5: We need to remove those Frankenstein bolts as they are not needed with this top. You need the "feet" on the hardtop to sit flush on the rear deck area above the chrome trim. You have a few options here:
A) Swap the Frankenstein bolt with the std. Phillips head bolt (easiest)
B) Remove the Frankenstein bolt, drill a hold in the "foot" and install an M8x1.50 bolt and washer.
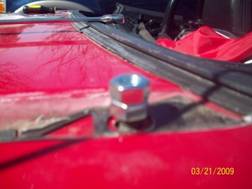
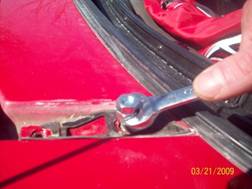
Removing the Frankenstein bolt is simple. First you want to take off the bolt portion. The bolt itself is a Phillips head, but the metal is very soft. Is a flat head screw driver that sized just a little smaller than required. This allows you get in a little further for extra grip. Remove each of the bolts, and then remove the (2) Phillips head bolts behind the Frankenstein's. Use the flat head again for these bolts. Now take the chrome trim piece off by simply prying it out of place. Be careful not to tear your gasket underneath. With this done, you should have a single M8 stud sticking up. Use two M8 nuts and lock them together (loosen the bottom, tighten the top will squeeze the two nuts together). Put your wrench on the bottom nut and turn the nut counter-clockwise to loosen. The studs might be a little tight due to the loctite used on the original factory install. Now that you have that complete you can place the chrome trim back in place and either go with option A or B at this point. If you choose Option A, reinstall you bolts, studs and then your Frankenstein bolt using the reverse procedure and go to step 6.
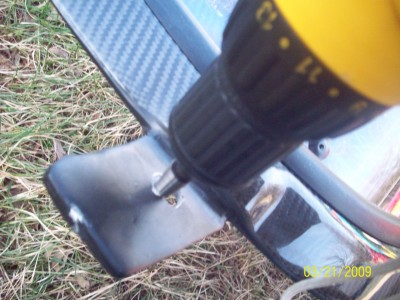
Step 5B: Now at this point, you have decided to drill a hole in the "feet" and install a bolt. This part is very easy. On the hardtop, you will see a rounded "triangle" this is where the Frankenstein bolt would normally lock into. Using a Unibit or drill bit, drill your hole to a 1/2" size. You are going bigger to allow adjustment at the rear of the hard top. That's it. If you missed your mark, it wont be by much and you can easily "egg" the hole out a bit to accommodate. A nice finishing washer will easily cover the enlarged hole.
Step 6. You and a friend should now pick up the hard top and guide the top over the car with each of you standing on either side of the top (driver/ passenger). With the latches UNLOCKED, insert the front edge first then carefully lower the rear until the top is resting in place. Go ahead and secure your front latches, and then your rear latches. If you notice the latches are too easy to latch, you will need to adjust them so they have a slight tension to them to allow the top to fit snugly in place.
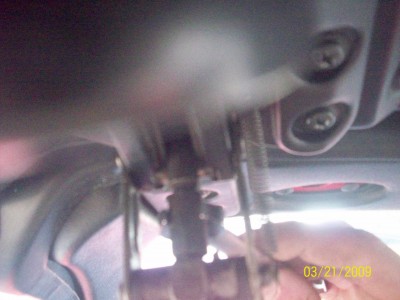
To adjust the latches, "unlock" the latch and you will notice a hinged black cover between the springs on the latch. You can flip this over down and expose a shaft that fits a 10mm wrench. The shaft slides up a threaded shaft above it. You want to turn your wrench clockwise (right to left) to "shorten" the latch. Flip the cover back in place and test the latch. If it feels too strong, let some slack out. Do this for all of your latches to ensure a good seal.
Step 7: Your final step is the back window. If you are transferring your hardware from your old hardtop, then you should have a professional glass shop reinstall the back window along with all the seals and trim. If you choose to install a Lexan window, just follow the instructions that came with your supplied window.
Now that you've finished everything, you are ready to go! Enjoy your new hardtop!!
Additional Parts Needed:
-Back Window; Either OEM or 1/8" Lexan (Lexan is easy to bend)
-Rubber Seals and Tracks (sides and rear)
-Latches (two front, two side) or SPEC Miata brackets
| Back to the Garage |
8 October, 2008 |
| [Home] - [FAQ] - [Search] - [Sponsors] - [Forums] |
| [Garage] - [Clubs] - [Contact Us] - [Disclosures] - [More...] |
Copyright
©1994-2024, Eunos Communications LLC
|