Miata Ignition
Last updated:
2 July, 2016
Table of Contents
- Pinging
Pinging occurs when the fuel mixture in the cylinder
ignites and completes its burn before the piston reaches the maximum compression
point in its travel. It sounds as though a handful of marbles were dropped
into your engine and generally occurs under hard acceleration under load.
There are several possible causes of pinging. Among
them:
Fuel octane is a measure of the ability of the gas to
spontaneously ignite. (For more information on octane, see the Gasoline
FAQ.) When the octane is too low, the fuel in the cylinder burns too
quickly causing ping. The stock Miata is designed to run on 87 octane
fuel. If you have modified your intake tract, your Miata may require higher
octane fuel than 87.
- Timing advanced too far
Advanced timing means that the spark which ignites the
fuel mixture in the cylinder occurs before the piston reaches top dead
center of its excursion. Factory spec for the Miata specifies standard
timing as 10° before top dead center (10° BTDC) ±1° at idle
speed (850 rpm). If your timing is advanced more than this, you may
experience pinging under some conditions.
- Spark plug heat range incorrect
The size of ceramic insulation on a spark plug determines
the heat range of the plug. If the heat range is too high (longer insulator)
the plug itself can begin to overheat causing detonation of the fuel-air
mixture. If other methods fail, you might try switching to a plug designed
to run cooler. Typically, a colder plug is better if most of your driving
is long distance, high speed travel. For stop and go driving, a hotter plug
is supposedly better. OEM plugs usually are somewhere in the middle.
Hesitation
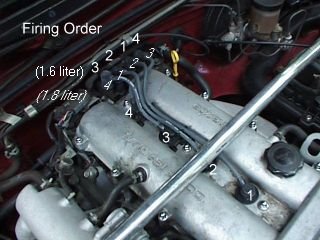
Common Problem! The factory ignition wires on the
Miata only seem to last between 30,000 and 50,000 miles. If you are experiencing
misfiring and hesitation and you haven't changed your wires, this is most likely
the cause. Change the wires! In case you forget which plugs is which, refer
to the firing order diagram below.
This is caused by breakdown of the insulation on the wires
which results in the spark arcing through the insulation to the metal valve
cover instead of through the spark plug electrodes.
Dave Weckerle sent in this bit of information regarding
hesitation. Although the wires are the most common cause, if you have a '96
model, you might try this solution:
Last April I purchased a 1996 Miata. Unfortunately it
didn't run like the 1995 that I test drove. Mine would surge or hesitate on
acceleration and at normal cruising speed. I spent several hours in the shop
where they tried advancing the TPI to .8 and several other little "tricks"
none of which worked. I was then told that the problem was normal for the
1996 model because one of their factory service reps was having the same problem.
Yesterday I read the article about advancing the timing to 14 or 16 degrees
and decided to try it. The car now runs like I think it should. No surge or
hesitation.
There is another possible cause for hesitation and poor
idling:
Water in the engine - if you clean the engine bay with a
pressure hose and spray the top of the engine block, you may have troubles.
The rubber seals on top of the spark plugs aren't so great, so some water can
seep into the cylinders, particularly the no. 1 cylinder. Once it dries out,
everything should be fine. You may need to blast the water out with high pressure
air.
Stalling
Many owners have complained about stalling or being on
the verge of stalling after stopping at a light. The most common cause seems
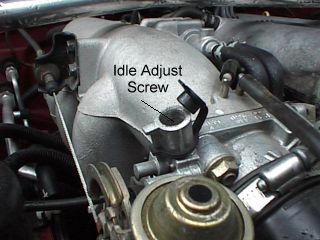
to be the idle speed. The Miata idle speed is specified as 850 ±50 RPM. If you
have a tendancy to stall, try adjusting the idle speed to the maximum of the
range or 900 RPM. Adjust the idle speed screw.
Uneven Running
If your Miata is running unevenly, sometimes stalling, sometimes
hesitating, there could be another problem. Your timing belt may have jumped
a tooth or worse, your crank shaft may be broken.
An easy way to check is, pull #1 spark plug, and drop the
dipstick down the hole. Turn the motor by hand and watch the dipstick until
it peaks at top dead center. This will tell you the crank shaft is at TDC. Now
check to see where the timing mark on the crank pulley lines up. If it is to
the left of 0, then the key way may be worn or the timing belt may have jumped
a tooth (or was improperly installed). In either case, you need to pull off
the timing belt. While its off, check the keyway on the crank nose.
There is another possible cause for hesitation and poor
idling:
Water in the engine - if you clean the engine bay with a
pressure hose and spray the top of the engine block, you may have troubles.
The rubber seals on top of the spark plugs aren't so great, so some water can
seep into the cylinders, particularly the no. 1 cylinder. Once it dries out,
everything should be fine. You may need to blast the water out with high pressure
air.
Power loss
- Timing retarded too far
When the timing is retarded to the point that combustion
occurrs later than 9° BTDC (which means the timing is set to less
than 9°), the combustion of the fuel-air mixture is no longer occurring
at the most efficient time. The piston is already beginning to travel back
down the cylinder when the combustion occurrs. The piston is therefore travelling
a shorter distance under power which translates to power loss. The timing
on a stock Miata should be set to 10° before top dead center (10° BTDC)
±1° at 850 RPM idle speed.
With a turbocharged or supercharged engine, this may
not hold true. Set the timing based on the manufacturer's recommendations.
- Spark plug gap out of spec.
As spark plugs wear, the gap between the electrodes
tends to get a bit wider. The standard gap on the Miata's spark plug should
be 1mm. A wider gap may result in misfiring due to the voltage not being
quite high enough to cause a spark across the electrodes.
Warning on Compression Checks
We received this message from Ryan Ruston:
I recently had a bad experience with the coil packs
on my 1995 Miata. You may want to share this on the site.
I recently bought a 1995 Miata and had a friend do a
compression check on the motor. He pulled the fuse for the fuel injection and
proceeded to remove one spark plug and plug wire at a time and check the compression.
When done, we put everything back together and the car wouldn't start.
Turned out that the coil assemblies where fried. Apparently, leaving one of
the plug wires open put too much of a strain on the ignitors and burned them
out. Fortunately, we found a coil assembly from Mazmart in Atlanta for only
$125. Now the car runs fine. The point is, don't do a compression check without
either pulling the connectors from the coils or keeping a spark plug in the
wire while turning over the engine. Hope this helps someone else.
- Splitfire Plugs
Although it has been reported in Miata Magazine that
an increase of 1 or 2 horsepower can be achieved using Splitfire spark plugs,
many owners report no discernable difference in performance. You should
also read the Federal Trade Commission action involving
Splitfire before making your decision. In addition to the substantially
higher cost of Splitfires ($5 - $6 per plug instead of $1 - $2), there are
two other problems that have been reported:
- The washer sometimes remains when the plug is removed.
The crush washer is not permanently mounted to the plug. This has resulted
in the washer remaining behind when the spark plug is removed from the
head. It then becomes necessary to use some sort of clever tool to retrieve
the washer.
- The boots on the ignition wires sometimes remain
on the plugs.
The ceramic insulator on the spark plug has straight sides - not ridges
like the factory NGK plugs. As a result, the rubber boots on the spark
plug wires sometimes grabs the ceramic insulator so tightly that the boots
stay behind when the wires are removed. When this happens, there is no
way to fit a spark plug socket on the plug and therefore no way to remove
the plug. (When this happened to me I had to use a scalpel to cut the
rubber boot off the plugs and retrieve the pieces with a long tweezer.)
Some people have had better luck by using dielectric grease on the ceramic
insulators and wire boots prior to installing the wires. I haven't tried
it.
- NGK, Bosch Platinum, others...
NGK plugs are OEM equipment. Some owners have reported
better performance by using Bosch Platinum plugs, but any difference would
be miniscule - under 1hp. It is highly unlikely that the difference would
be detectible. Still, if you're autocrossing and need every extra bit of
power, you may want to consider higher performance plugs.
Replacing Spark Plugs
Tools required:
-
- 5/8" Spark Plug Socket
- 6" Locking extension
- Torque wrench
- Gap tool
- anti-seize compound
-
- Silicone Grease (optional, but recommended)
How to change spark plugs:
- Remove Spark Plug wires from plugs
Do not grab the wires themselves! Remove the ignition wires by firmly
grabbing the boot that seals the spark plug well.
- Remove plugs
Using the spark plug socket and the 6" extension, carefully unscrew the
plugs. Be careful not to drop any foreign matter into the wells.
- Check gaps on new plugs
Most spark plugs come pre-gapped. Ensure that the gap is 1mm using the gap
tool.
- Apply a thin layer of anti-seize compound to plug threads
- Install plugs - don't tighten
Using just the 6" extension and the spark plug socket, (do not use a
ratchet yet), carefully screw the new plugs into the engine. Be extremely
careful not to cross thread the plug! Make them hand tight only.
- Torque to spec
Using a torque wrench, tighten the spark plugs to 11-17 ft-lbs.
- Apply Silicon Grease to inside of bottom seals of plug
wires (i.e. inner surface of plug wire which mates to the ceramic insulators
on the plugs)
- Re-install ignition wires and start it up!
 The
Miata ignition wires are, arguably, the weakest point in the car. As early as
20,000 miles, (but generally closer to 40,000 miles) the insulation begins to
break down and develop small pinholes which result in the spark going through
the pinhole to the block instead of across the electrodes of the spark plug.
This problem surfaces as hesitation at low RPM.
The
Miata ignition wires are, arguably, the weakest point in the car. As early as
20,000 miles, (but generally closer to 40,000 miles) the insulation begins to
break down and develop small pinholes which result in the spark going through
the pinhole to the block instead of across the electrodes of the spark plug.
This problem surfaces as hesitation at low RPM.
The ignition wires in the Miata should be replaced every
50,000 miles or sooner if you begin to develop a low RPM hesitation or misfiring.
Factory wires vs. NGK
The blue NGK wires are clearly superior in longevity to
the original black wires on the early Miata models. Newer models may come with
the blue NGK wires. Even with the higher quality wires, eventually they will
break down. There are several aftermarket companies which also make high performance
wires, and others that make "dubious" performance claims. Magnecor
is considered a high performance wire. They also have an excellent
writeup which debunks many of the claims made by less reputable companies.
Checking timing
Tools required
- Inductive Timing Light
- Jumper or paper clip
- External Tachometer
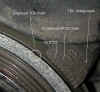
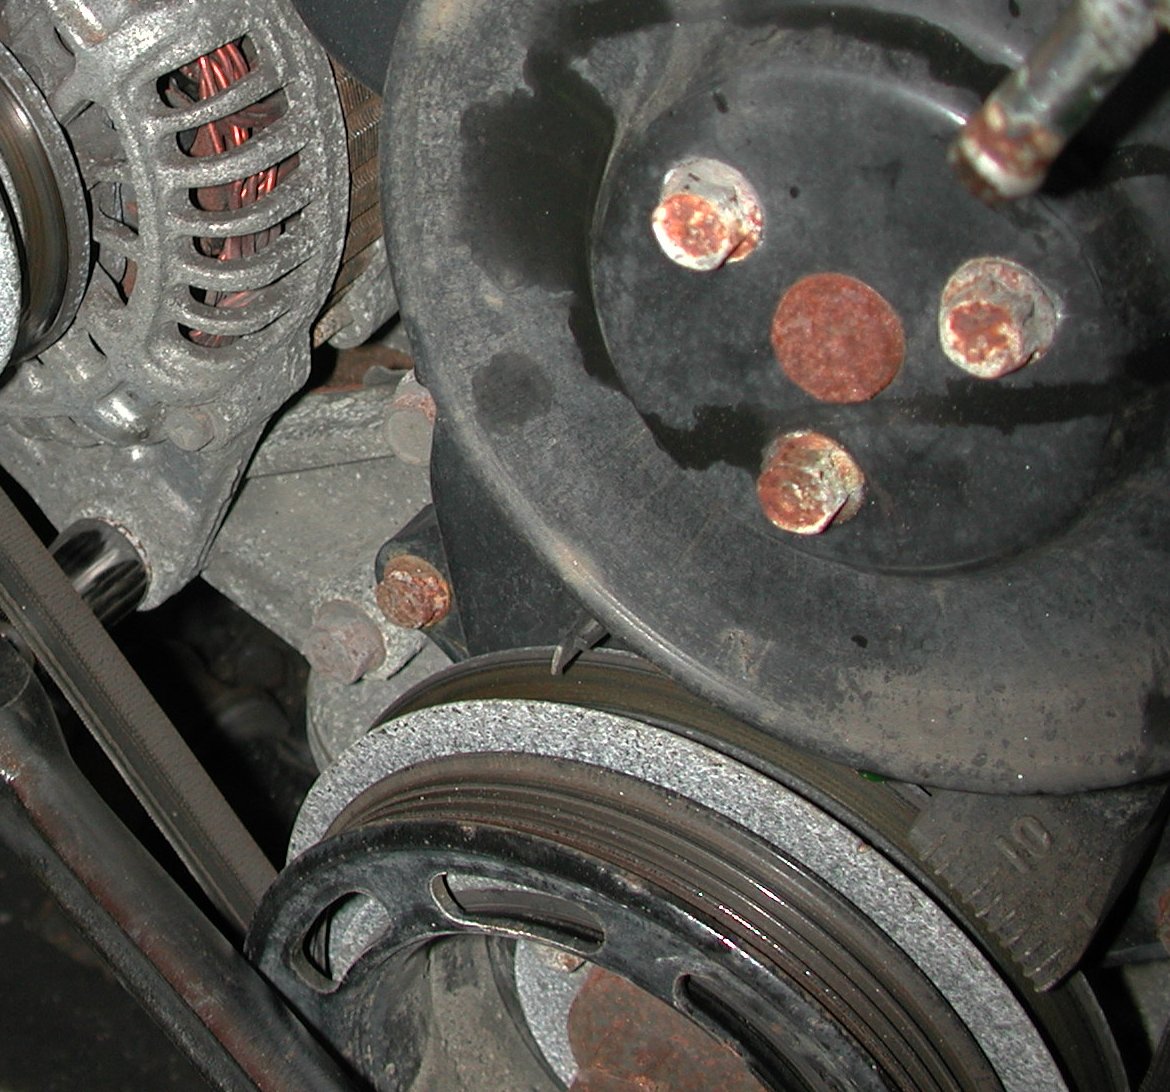
 Begin
by finding the big pulley on the front bottom of the engine, there should be
a little hunk of plastic to the top right of it with markings on it. On the
back rim of the pulley feel around until you find a notch in it. It may require
turning the car on and off a few times until it is in a reachable location.
When you find the mark, put a dot of White-Out or something on it to mark it
(you know, the stuff that covers ink-pen errors). This
photo shows the plastic thingy and the little etched timing notch.
Begin
by finding the big pulley on the front bottom of the engine, there should be
a little hunk of plastic to the top right of it with markings on it. On the
back rim of the pulley feel around until you find a notch in it. It may require
turning the car on and off a few times until it is in a reachable location.
When you find the mark, put a dot of White-Out or something on it to mark it
(you know, the stuff that covers ink-pen errors). This
photo shows the plastic thingy and the little etched timing notch.
Make sure all accessories (A/C, lights, radio, heater, etc.)
are turned off and engine is warmed up to operating temperature.
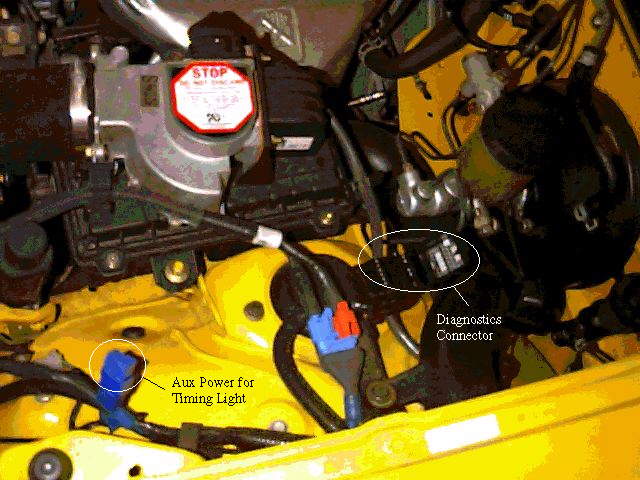
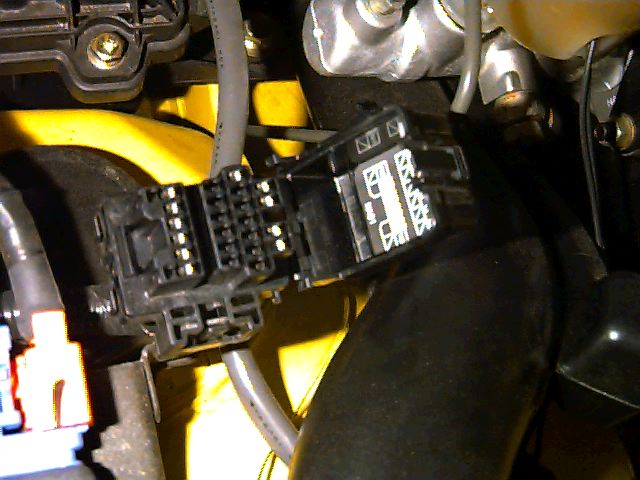
 Next,
locate the diagnostics connector (close-up
view) on the driver's side of the engine compartment near the air intake.
It 'll be on the drivers side in plain sight. Pop it open and look for the GND
and TEN places. Get a paperclip or hunk of wire, and while the engine is running
shove it down into the correct GND and TEN holes. (This puts the on-board computer
into the proper mode for setting the timing.) When you push it in there hard
you may hear the engine slow down. Now check the tachometer (or if you don't
have one, use the one on your dash) to see what its at. It should be around
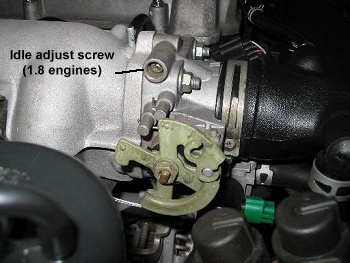
850. If not, its easy to fix. Find the big screw
over on top front of the intake (big metal thing on passenger side). It should
be covered with a black rubber plug, but some are missing. Just turn that screw
till you get your idle speed to 850 RPM.
Next,
locate the diagnostics connector (close-up
view) on the driver's side of the engine compartment near the air intake.
It 'll be on the drivers side in plain sight. Pop it open and look for the GND
and TEN places. Get a paperclip or hunk of wire, and while the engine is running
shove it down into the correct GND and TEN holes. (This puts the on-board computer
into the proper mode for setting the timing.) When you push it in there hard
you may hear the engine slow down. Now check the tachometer (or if you don't
have one, use the one on your dash) to see what its at. It should be around
850. If not, its easy to fix. Find the big screw
over on top front of the intake (big metal thing on passenger side). It should
be covered with a black rubber plug, but some are missing. Just turn that screw
till you get your idle speed to 850 RPM.
Connect the timing light power cable to a source of 12volt
power. Since the battery is not in the engine compartment, you should use the
auxiliary power connector provided for this purpose.
There is a blue connector which is not connected to anything located on the
driver's side of the engine compartment close to the side of the car about halfway
between the diagnostics connector and the headlight motor. Remove the dummy
connector to expose the conductor. This is where the timing light positive red
wire can be powered from. Connect the timing light ground connection (the black
wire) to a suitable grounding point such as one of the unpainted bolts or other
unpainted metal connected directly to the body. Put the inductive pickup around
the number 1 spark plug wire which is the one closest to the front of the car.
You don't have to pull the plug wire off. Be careful you don't let any of those
dangling wires catch in the fan or belts.
 Now
make sure your car is idling at about 850 RPMS with jumper in place and everything
connected. Turn the switch or pull the trigger or whatever on your timing light
and watch that big pulley with the yellow or white timing mark. As the light flashes, it will
make the marking on the pulley appear to "stand still". You
will see the mark appear next to a certain spot on those plastic
markings. Refer to the photo. The engraved mark should be hanging around right
at the 10° BTDC mark. If not, first check your idle speed. Otherwise you will
have to set the timing as described in the next section. Each mark represents
2 degrees of timing advance. Factory specification is 10° before top dead center
(10° BTDC) ±1°. If it is not where you want it, be it 10° or advanced to 14°
for a bit more power, you need to set the timing.
Now
make sure your car is idling at about 850 RPMS with jumper in place and everything
connected. Turn the switch or pull the trigger or whatever on your timing light
and watch that big pulley with the yellow or white timing mark. As the light flashes, it will
make the marking on the pulley appear to "stand still". You
will see the mark appear next to a certain spot on those plastic
markings. Refer to the photo. The engraved mark should be hanging around right
at the 10° BTDC mark. If not, first check your idle speed. Otherwise you will
have to set the timing as described in the next section. Each mark represents
2 degrees of timing advance. Factory specification is 10° before top dead center
(10° BTDC) ±1°. If it is not where you want it, be it 10° or advanced to 14°
for a bit more power, you need to set the timing.
Setting timing
Note: The timing on the '99 Miata is not
settable. The '99 engine is designed with variable timing and a knock sensor
which will automatically retard the timing if the engine pings. However, someone
has found a method to change the '99 timing (although we don't recommend it
and we have no performance data to back it up.) Read about
it here.
Tools required
- 12mm socket
- Socket wrench with articulated head (if possible)
- Timing light (Note: Many timing lights with tach/advance
measurement features are a bit confused by the double ignition pulse of the
Miata. The use of the strobe is not confusing (it works out visually just
fine) but the tach/advance meter will read double of what it should because
of the double pulse. )
Set up your timing light and diagnostics jumper as described
in "Checking Timing" above. With the jumper
installed, your idle should be about 850 RPM. If it is incorrect, adjust it
with the idle air bypass screw located on the throttle body. The screw is under
a black rubber cap. Clockwise lowers the idle, CCW raises it.
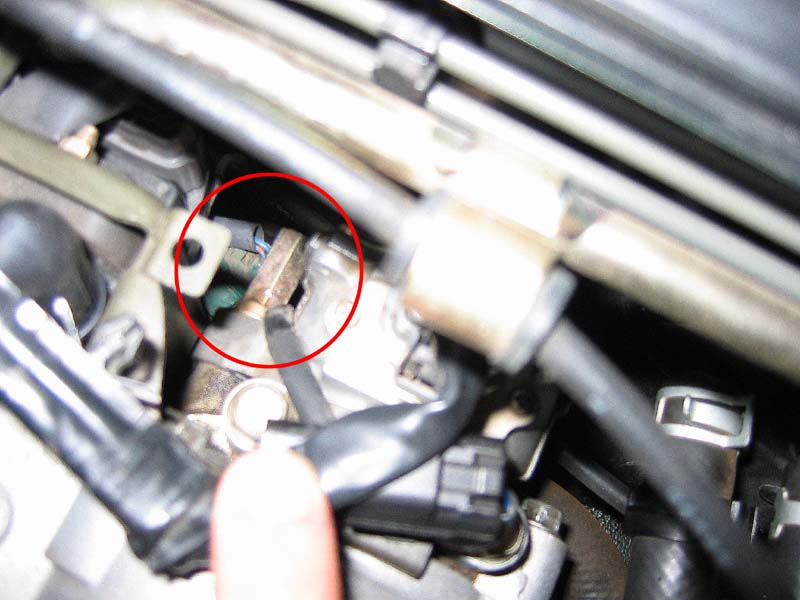
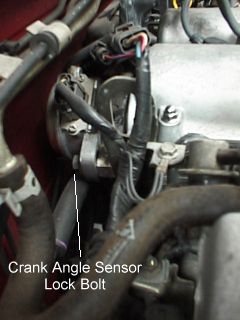 For
1.6 liter engines locate the crank angle sensor
(close-up view) at the rear of the passenger side
valve cover, close to the firewall. It is a circular metal unit that sits right
on the rear of the valve cover. Locate the locking bolt for the sensor.
This is on the lower side of the sensor bracket nearest to the passenger side.
Using a 12mm wrench, loosen this bolt only enough to allow you to rotate the
crank angle sensor. As the crank angle sensor is rotated (only a small amount
at a time), you will see the timing change with the timing light. When you
get the timing back in spec, tighten the lock bolt. (photo
of CAS Lock Bolt on '97 1.8)
For
1.6 liter engines locate the crank angle sensor
(close-up view) at the rear of the passenger side
valve cover, close to the firewall. It is a circular metal unit that sits right
on the rear of the valve cover. Locate the locking bolt for the sensor.
This is on the lower side of the sensor bracket nearest to the passenger side.
Using a 12mm wrench, loosen this bolt only enough to allow you to rotate the
crank angle sensor. As the crank angle sensor is rotated (only a small amount
at a time), you will see the timing change with the timing light. When you
get the timing back in spec, tighten the lock bolt. (photo
of CAS Lock Bolt on '97 1.8)
You can find the cam sensor on your 1.8 liter Miata by following the driver's side hump in the valve cover to the back of the head.
On the rear face of the head you will find a round unit with a multiplug on
it. This is the sensor. There is one bolt with a twelve mm head on it that is
the hold-down. If you were sitting in the driver's seat looking at the back
of the head, the bolt is at about five o'clock. Don't forget to jump the TEN
and GND pins in the diagnostic connector (close-up
view) before setting.
Note: When rotating the CAS to adjust your timing be sure
to check for leaks. You may also want to consider replacing the CAS o-ring seal.
If the seal is old, the rotation of the CAS can lead to the seal being compromised.
An oil leak will start under the CAS and then oil will deposit on the heater
hose.
Use the correct painted dot
on the crank pulley. Depending on what year you have, it may be a white mark, or it may be a yellow mark.
- 89-93 a white mark at TDC.
- 94 a yellow mark at TDC and a white mark at 10 degrees
BTDC.
- 95 a white mark at 10 degrees BTDC and a yellow mark at TDC. (Some people have said there is no yellow mark.)
- 96-98 same as 94.
- 99 timing is not adjustable
Jared Stack points out: It's best to set the timing when
the car has warmed up to the point where the idle has settled and the engine
is up to operating temp, but is still relatively cold. The motivation for doing
this is to make sure that when you check your timing that the radiator fan is
not running. If it activates, the timing will be retarded by 1-2 degrees. The
consequence of setting it at this point is when you are on the open road at
speed the fan usually won't be running as much and the timing will be higher
than what you thought it was set to. There should be a fuse for the radiator
fan... just make sure you put it back when finished. :-)
If you tweak the idle this will affect the baseline value
of the timing. Tweak idle with jumper in place and correct the timing. After
adjusting the idle (improperly, without the jumper) to compensate for the current
draw of the Hella H4's, my timing was retarded by about 3 degrees!
Harry Sue has a good timing writeup with more photos at
http://www.rivercityroad.com/garage/timing.html
Rick Fischer (rickfisc@ozemail.com.au)
helps clarify Jared's statement:
Timing must be set with the motor in a no load condition
at the specified idle speed. Electrical loading of the alternator sucks horsepower,
drag on the motor - slows it down. Therefore the revs aren't right. The timing
mark may move when the motor drops revs but that is a function of the rev
drop not the electrical load.
The Hellas did not affect his timing by 3 degrees the
current draw and motor slowing did. Advancing the timing to compensate will
have just advanced his timing - period.
This may cause problems if the person doing the retiming
is not across the general principles of ignition timing, and accepts Mr. Stack's
comments on their face value. Someone advancing their timing to the 16 or
18 degree marks and then compensating for what they think is another factor
may well over advance the timing to the point where detonation may occur;
i.e. 16-18 plus 2 for the fans and 3 for lights = 21 to 23. The Pinging may
well be a very expensive noise, breaking rings and cracking pistons in extreme
occurences.
Very simply, time any motor - no load. No A/C, no lights,
no fans.
- 89-93 a white mark at TDC.
- 94 a yellow mark at TDC and a white mark at 10 degrees
BTDC.
- 95 a white mark at 10 degrees BTDC and a yellow mark at TDC. (Some people have said there is no yellow mark.)
- 96-98 same as 94.
- 99 timing is not adjustable.
Extra power by advancing
Most Miata engines can benefit from advancing the ignition
timing. How far you can safely advance the timing will depend on several factors.
One major factor is fuel octane. The higher the octane you are willing to buy,
the more timing advance you will be able to run. Ambient temperature also plays
a role--the hotter the weather, the less timing your engine will tolerate. Different
Miatas also have their own idiosyncrasies about timing. As engines pile on the
miles they develop an octane appetite from carbon deposits in the combustion
chamber which can cause hot spots and actually raise the compression ratio of
the engine by reducing the size of the combustion chamber.
Many enthusiasts have found that they gain a few extra horsepower
by advancing the timing to 14° BTDC. Some have gone as high as 18° BTDC without
problem. The difference between going from the stock 10° to 14° is much more
noticeable than going from 14° to 18°. Ping is usually experienced under hard
load driving - not idling in your driveway. So you'll have to set the timing
and drive it for awhile before you really know the effects.
Timing for Modified Intake Tract
If you've modified your air intake with the installation
of a turbocharger, supercharger, Cold Air Intake, or other type of upgraded
high flow intake system, the timing rules may change. You should follow the
advice given by the manufacturer of your unit.
 Bill
Cardell from Flyin' Miata shares his method:
Bill
Cardell from Flyin' Miata shares his method:
The stock tach is close enough for
what you are doing. Just look at where you are idling without the jumper connected,
before you mess with anything. That is the idle you want to end up with. After
setting the timing (with jumper installed) adjust the air bypass screw on the
throttle body to bring the idle to 850 (with the jumper still installed). The
bypass screw is located under a black rubber plug on top of the throttle body.
The throttle body is located on the passenger's side of the engine. The throttle
cable goes to it. After setting the idle speed, double check your timing. I
would suggest scribing a mark on the cam sensor *before* moving anything. This
way you can return towards stock without hooking up the timing light again.
I say this because despite what MM says, every Miata seems to tolerate a different
amount of timing. If it pings just sneak back towards stock 'til it stops.
(Note: Photo above is for 1.6 engine.
Front view, 1.8. Side
view, 1.8.)
Phil Logan contributes:
The tacho connects to the IG terminal
on the diagnostic connector.
The diagnostic
connector is on the driver's side and is cunningly disguised as a DIAGNOSTIC
CONNECTOR (close-up view) It's nice when things
identify themselves :-)
If you pop the lid of the diagnostic
connector, you'll see a bunch of terminals and, inside the lid, a little diagram
saying what the terminals are.
To set the idle, put a jumper wire
between terminal TEN and ground, and connect the tacho to the IG terminal
(that's towards the bottom right hand corner of the connector block. The TEN
<- > ground shorting wire is necessary to properly set both idle and
timing.
You may find, as I did, that when
you connect the external tacho, the car's tacho reads zero - don't worry,
you haven't broken it, it's just that most budget analogue meters have fairly
low impedance and affect the tacho filter, so the internal tach doesn't see
any pulses.
The idle speed
adjuster (close-up view) is at the front of
the intake manifold on the passenger side, and should be covered by rubber
plug. When I did my timing, I hunted around for this plug for a bit before
realising that the plug wasn't there and the speed adjuster screw was exposed.
So look for either a likely looking recessed screw, or a rubber plug that
looks like it's hiding one.
To increase the idle rate, turn
the screw anti-clockwise. It looks like it's about half a turn for about 500
rpm. The manual I had said that the idle speed should be between 800 and 900
rpm, but I set mine a little higher to get rid of the idle-droop I was getting
from time to time.
When you're all done, bung up the
timing adjuster plug, remove the jumpers, clip the diagnostic connector top,
drop the hood and have a blast.
I'm assuming your car is LHD. If
not, things may be moved around a bit.
Robert Meushaw shares some of his experiences when working
on accurately setting his idle speed.
As a matter of intellectual curiosity, I decided to investigate
the correlation between the Miata tach reading and the IG- signal on the diagnostic
connector. Fortunately I have a digital storage oscilloscope and a digital
frequency measuring multimeter. The signal coming from the IG- test point
is a pulse approximately 2 milliseconds in width and approx. 12 volts in amplitude.
I measured the pulse frequency when the tach indicated that the car was idling
between 700 and 1000 rpm. The scope reading and frequency meter reading indicated
approximately 29 pulses/sec. Multiplying by 60 gave 1740 pulses/min., which
is not correct. But, dividing by 2 gives 870 pulses/min which is about right.
Therefore, the conversion from the IG- signal to rpm is
RPM = ( PPS x 60)/2 or PPS x 30
This is perhaps more effort than is needed to get a correct
rpm reading, but inquiring minds want to know. Please note that these measurements
were taken without shorting the TEN pin to ground, but the rpm signal correlation
would still be the same.
Advancing the Timing on a '99 Miata
This was on a US-spec car in Puerto Rico. We have no additional
information regarding performance, reliability, or anything else. Miata.net
does not recommend this
procedure.
"I advance the ignition to 14 degrees on my '99. It's
a matter to trick the ECU. How?, Repositioning the Crankshaft Position Sensor
more upward. CPS is on the right down side of the Crankshaft Pulley. First,
I disconnected the CPS connector, remove the undercover, then remove the CPS
bolt. Once a time I got it out of the car I proceed to enlarge the hole (bottom
side) of the CPS bolt in order to get the upward reposition. Using my portable
Dremer I cut off ("bore") about 2-2.5mm from the integrated washer
in the mentioned hole. Finally, I installed back the CPS having condider the
following: Air gap between Pulley Plate teeths & CPS (Spec: 0.5-1.5 mm)
and tightening torque of CPS bolt is 69.5-95.4 in-lbf. Past Specs were taken
from the Miata'99 Workshop Manual.
After complete the installation. I used Timing light to
check my new timing and SURPRISE!: timing is now oscillating between 14-16 degrees
at idle instead of the factory oscillating 9-11 degrees."
