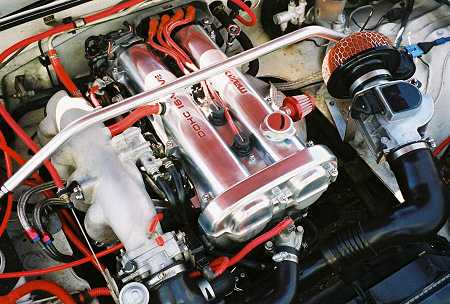

I decided that I wanted to clean and dress up the engine bay on my 1990 Mazda Miata, "GRACIE". The aluminum components had been etched and discolored by years of crud and salts from being in a beach area (Norfolk, VA). I should have known better!! Since my car is a daily driver, the first step was acquiring a spare valve cover. A friend in the MiataNuts car club, J. Dan Cheche, had just gotten hold of one, so "Damn the Torpedoes!!", I started out on the adventure.
After you get the piece fairly cleaned up, you begin to notice a few things, like POROSITY!!! Casting lines are deep all around the edges, and the indented writing is full of crud. There are 3 steel baffle plates on the inside of the cover, a PCV grommet, and a 10mm oil vapor outlet.
Remove the PCV valve grommet and plan on a replacement, unless the piece is very new, because they get brittle fast due to heat and oil vapors.
Insert a 8mm bolt, a long one, into
the oil vapor nipple. Using a ViseGrip plier, first twist to break loose, then
twist and pull to remove it. Be carefull! This is a pain, but believe me, it's
a pain in the butt to sand and polish around it!
Next, using a #2 Phillips screwdriver, remove all of the M4 screws (19 pcs.),
and place them in a ZipLoc bag. LABEL the BAG!! and store so you can find it
later. The screws will probably have to be cleaned, so keep this in mind. Now
you have to GENTLY pry up and remove those 3 steel baffle plates. These have
been gasketed in place using Silicone, which under heat can be just like glue!
Be patient, they will break loose with gentle persuasion, but if one does bend
it can be straightened. Unless you are very lucky or have owned the car since
new, the area under the baffle plates will be filthy with burned oil, and be
difficult to clean. The mating surfaces will clean up with a wire brush in an
electric drill. Any residue should be picked out.
Now the FUN begins... I use a Black & Decker WorkMate to position and clamp the part. Use a file to clean up the casting lines around the edges, you may need 2 or 3 different shapes to get the job done. I used 80 open grit cloth to get the main cleanup started. I then went to 120g, then 180g. Then I switched over to ScothBrite abrasives to get a "Technical" close grained finish, in 3 stages of grit. I wanted it to look like polished aluminum, not chrome!!! The first 2 grits of the ScotchBrite were used in a cordless 2-speed Ryobi electric drill with standard arbors and pads obtained from Walmart. I then glued the "hook" side of Velcro to an arbor, and cut some squares from pads of ScothBrite. This was used at low speed. Final finish was by hand in one direction to give a Grain.
Polish was done using Mothers Mag and Aluminum Polish. Terry cloth was used both as applicator and polishing cloth, using diections printed on container. It works!
A 3-M Spot Sanding Pen was used to clean and prep the letters indented in the cover. I used Plasti-kote #3228 Toyota Red brush-in-bottle touch-up paint to do the letters, multiple coats had to be applied.
Baffle plates were reinstalled using Permatex Form-A-Gasket. The oil vapor tube and PCV Grommet were also replaced.
It took about 20 hours to do this,
but touchups are easy, and it does look GREAT! I'm doing other units for other
club members, and have also done an Intake Manifold.
| Back to the Garage |
17 July, 2003 |