Here is a simple and cheap way to
convert your side maker lights to turn signals as well.
All you need is about 3 feet of wire, some electrical tape, wire cutters and
splicers.Total time involved about 1 hour.
First remove the two phillips head screws from the side marker light and pull the light assembly out. You will see two wires attached to the lamp. Cut the black (ground wire) about 1 1/2 inches from the lamp.You will probably have to cut some of the plastic tubeing around the wire to get the 1 1/2 inches. In order for this to work, you MUST CUT the wire. Splicing into it will not work.
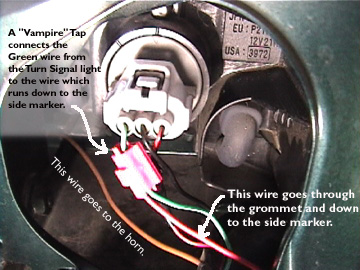
Next remove the front turn signal/parking lamp assembly. You will see three wires going to the single lamp in the assembly. Black is ground. On my car green is the turn signal, and the other wire is the parking lamp. Carefully cut about 1/2 inch of insulation from the green wire. DO NOT cut the wire, just the insulation from it, so about 1/2 inch of bare wire shows.
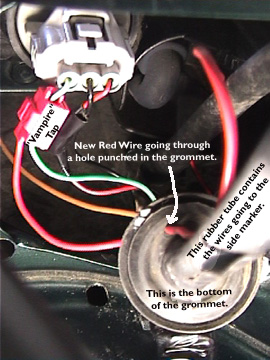
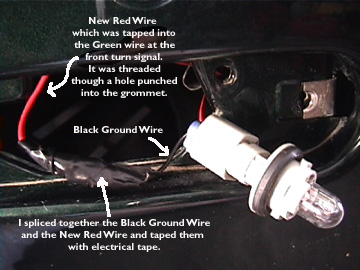
Next flip up your headlights. Under the headlights you will see a rubber grommlet with a wire going through it to the side maker light. Either put a small hole in the grommlet or peel a side of it away, so you can feed a wire down throught it. This is the wire that you are going to attach to the ground wire of the side marker light that you cut earlier. Again,the wire MUST be attached to the wire oing to the bulb, NOT the wire feeding back into the harness.Splice the two wires together and tape them up. If you wish you can solder them as well, but it is not necessary. Once the wires are connected, you can then tape all the wires back up and reinstall the side marker light.
Now attach the other end of the wire to the green turn signal wire that you cut the 1/2 inch of insulation off of. Again you can solder this connection if you wish, but not necessary. Tape the wires back together and then tape all the wires together for a better seal.
I know this sounds strange connecting a ground wire to the hot wire of the turn signal, but it really does work. The hot wire acts as a floating ground for the side marker.
Once this is done, replace the front parking light assembly.
Repeat the same proceedure on the opposite side of the car.
When you are finished, what you will have is this.
The parking lights and side marker lights will work the same as normal.
In the daytime, when you put the turn signal on, the side markers will blink with the turn signal.
At night, when you have the parking
lights on, and use your turn signal, the side marker lights will blink opposite
of the turn signal. Meaning, when the front turn signal blinks on, the side
maker will
blink off, and visa versa.
This will not affect the use of your four way flashers. They will work the same as the turn signals work and side markers work.
If you really wanted to get carried away, you could do the same thing to the back side marker lights as well!
If you would like to convert your front side markers on your 1999 Miata to be used as turn signals, the following will describe how to do it.
Thanks to help of Miata Forum members Bob Copeland and many others, this method does NOT require removing the headlight assembly.
You will need:
1. a few feet of 18 gauge wire (about two feet per side);
2. some electrical tape;
3. two "Vampire" taps;
4. two #168 bulbs which are much brighter than the OEM #194 bulbs.
The goal is to connect the green wire coming out of the back of the front turn signal bulbs to the front side markers. On the passenger side, the front turn signal wire is Green with a white stripe; on the driver's side the wire is Green with a black stripe.
In order to connect the two wires, the ground wire (black) on the side marker needs to be accessed and cut. This can be done in the engine compartment. Once the ground wire has been cut, you will then connect a new wire from the side marker ground wire to the Green/white wire (passenger side) and Green/black (driver's side) at the front turn signal bulbs.
It is important to cut the black ground wire at the side marker instead of simply tapping into it because, otherwise, fuses will be blown. Also, be sure to splice into the piece of ground wire that connects to the bulb socket.
You will find that they blink simultaneously when the headlights are off; and, they blink alternately when the headlights are on. I like the alternate blinking a lot.
I performed the mod "add turn signaling to your side markers" on my 10AE to allow the front markers to blink with the turn signals and alternately from the turn signals with the lights on. I wanted to add lights to my rear markers since Mazda was so kind to leave them off of M2s, but i wanted them to act just like the front markers. To do this requires a very simple modification to the "adding lights to rear reflectors" mod. Follow all the directions posted there, but instead of wiring the light to the black and white wires of the parking/brake light, tap one lead of the lamp (vampire connects) into the white wire of the parking/brake light (same as before), and tap the other lead into the green wire of the yellow turn signal light (different from before). This wiring method uses the same "floating ground" concept as the front side marker wiring mod, but on both sides of the lamp instead of only one.
If you perform both of the side marker/turn
signal mods like i did your rear side markers will actually serve a purpose,
and your miata will look much cooler! Both of your side markers will act as
parking lights and turn signals, and yes, the alternate blinking with the lights
on is RAD!
| Back to Garage |
20 December, 2002 |