Folding Front License Plate Mount

By Randy Maheux

(Note: This is not legal in all areas. Check your local motor vehicle statutes.)

Front license plates. Most of us drive around without one, while some risk marring their bumper with the factory license plate mount. A few, who wanted the plate mounted low in the grille opening, shelled out $25.00 plus shipping for the folding mount available on the internet, only to find, as I did, that one run-in with a parking bumper trashed it.

In frustration, I made my own mount that recesses the plate into the grille opening and folds flat at about 30 MPH. For $5.00 to $8.00 in materials and about an hour’s work, you can make one like it. This way you can keep "Big Brother" off your back, without blocking airflow to the radiator or marring your bumper cover.

Here are the plans and materials list to make one of your own…..


List of Materials:

Qty

Size

Description

1

4" x 6"

¾" Wood (poplar or fir)

or

½" to ¾" "Star Board" (or any other plastic material)

1

2 ½" or 3"

Utility hinge (be sure it swings freely and that it does not have a removable pin).

1

2" x 8" x 1/8"

Aluminum or 8" galvanized "L" shaped framing plate, cut as shown

2

1 ¼"

#10 machine screws

8

#10

Flat and lock washers

2

1/8"

Fender washers

3

¾"

#10 Machine Screws

3

½"

#10 Machine screws

2

¾"

Self stick squares of Velcro (softer side only)

2

½" thick

Square, self stick plastic/rubber furniture bumpers

In obtaining the materials, you have a few choices to make:

Instructions:

  1. For the main board cut the poplar or star board to 4" x 6" size. Round all 4 corners and edges with sandpaper. Drill holes for #10 machine screws in the two rear corners. Center the hinge on the front edge and mark, then drill the hinge mounting holes.
  2. Make the metal plate mount. Use either the galvanized framing plate or aluminum, as described, above. Drill the two holes to accept the license plate ½" from each end and 7" apart. Center the hinge and mark and drill the holes to mount the plate to the hinge.
  3. Attach the hinge/plate to the base using #10 machine screws, with lock and flat washers. Be sure that the hinge is mounted so that the pin is on the inside, otherwise, it will get in the way of the license plate.
  4. Since only the main board shows (slightly) painting the assembly is optional. However, if you use wood for the main board, either paint it or use a penetrating oil finish to protect the wood. I did both, just to be safe.
  5. Attach the rubber bumpers and Velcro pads. The rubber bumpers are important, as they level the whole assembly in the sloped grille opening. Put them close to the side edges and use "dry fitting" to locate the best mounting place (front to back) to level the main board. The velcro pads keep the main board from marring the grille opening. Put them in the back, near the 2 mounting bolt holes
  6. To attach the mount, find the center of the grille opening. I used a plumb bob from the center of the emblem, then a strait edge to transfer this to the lower part of the grille opening. I then put a piece of masking tape so that one edge marked the center.
  7. Center the assembly, being sure that the plate will hang without hitting the lower part of the bumper cover and that the two mounting holes are far enough back so that the machine screws will go through the black plastic inner part of the grille opening. Use duct tape to hold the assembly in place while you drill the mounting holes.
  8. Drill the 2 mounting holes in the inner part of the grille opening. I used only the drill bit, turning it by hand. The plastic material is thin and soft enough that it took less than a minute of twisting to create each hole.
  9. Mount the assembly using the 1 ¼" machine screws, fender washers, and nuts. The fender washers go underneath the plastic inner part of the grille opening, to reinforce the area.
  10. Attach your license plate. I used a metal frame along with the plate and it did not affect the operation.

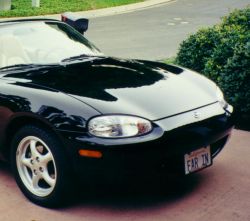
What the police see when stopped

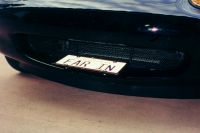
30 MPH in my driveway!

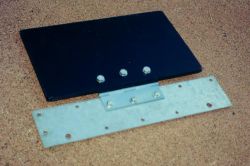
Unpainted, made of Starboard and a cut

galvanized framing brace