Turn Signal Repeaters are fender or mirror-mounted turn signal lights found
on cars manufactured for European, Australian, and Japanese markets. Miatas
from these areas have them mounted on the front fender, just behind the wheel
and in front of the door.
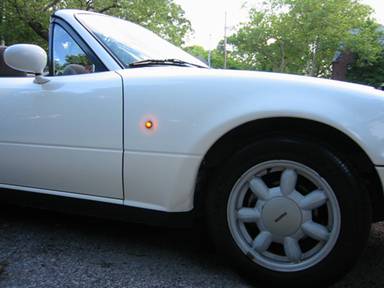
Being a big fan of the look and safety benefits of these lights, I decided I wanted them on my New York City based 1990 Miata. I wanted to keep my Miata looking stock, so I took a look at pictures of Miatas from Europe and Australia. The stock lights are round and amber, but a bit bigger than I would like.
I was able to find a pair of 3rd party turn repeater lights (also known as "side markers" when searching) from http://www.adleraudio.com.
The model I chose is the EuroLite 070636 by Toucan Industries (http://toucan.accrisoft.com). Sold in pairs, they are smaller than the stock ones, but not too far from the look I was after. They come with a choice of lens colors. To comply with lighting requirements, the light output needs to be amber, either by an amber bulb behind a clear lens, or a white bulb behind an amber lens. I chose the amber lens version for two reasons: It is the Miata stock lens color, and it allows for a much wider and brighter choice of white bulbs to put behind the amber lens.
If you choose a clear lens version of the same light, you're stuck with the only easily available US amber coated bulb, the dim 194NA. With some persistence, you can hunt down the Euro issued WY5W, found almost exclusively at car dealers selling European cars. Any other funky color would not comply with US vehicle lighting requirements. Do so at your own risk.
The amber-lens lights I purchased came with an amber bulb (unnecessary and watt-wasting since the lens is amber). After some bulb advice and inspiration from Daniel Stern at http://www.danielsternlighting.com, I chose the W5W Halogen lamp, a halogen 5-watt clear bulb that's designed to fit. (The bulbs, at about $40 for a 10-pack, were the most expensive part of this relatively cheap project.) A great alternative to the above bulb is the cheaper non-halogen W5W. It is virtually the same output, with a bit less lamp-life and only about $5 a piece or less.
The idea is that these lights flash in concert with your turn signals and hazards, and I knew I needed to wire them into my existing signals. Some people wire their after-market "turn-signal" repeaters or "side markers" into their parking light circuit. To me, that defeats the purpose of the project from a safety standpoint and certainly doesn't look "stock."
My biggest concern with wiring them into my signals was that the addition of these bulbs in the turn signal circuit, would throw off the flash rate, which in some cases I've learned is load-dependant. Fortunately, things worked out in my favor, and adding these lights and wiring them the way I did has not affected the flash rate in any way.
Drill
Drill Bits (various sizes)
Rotary Drill file or small round file
Flexible Tape Measure
Pencil
Phillips screw driver
Wire Strippers/cutters
Electrical Tape
Soldering Iron and Solder (optional)
Turn Repeaters and bulbs
1 Small Roll of 16-gauge auto wire (minimum about 30' [10 meters])
Touch-up Paint or Nail Polish
Total about $65 US.
$20 Lights
$40 Bulbs 10-pack
$5 Wire
About one and a half hours.
The Dreaded Drilling of the Hole

The install was more stressful in the planning stages, when the thought of drilling a hole in my fenders sent chills down my spine. The actual drilling was easy once I built up the courage. One of the advantages of the type of light I chose, is it only requires one simple cleanly drilled hole. I picked a location I was happy with: about halfway between the wheel well and door seam, and slightly above the top of the front tire. I used the door seam and the bottom of the fender for measuring reference points. A small flexible measuring tape helped me find a center point, and match it to the other side.
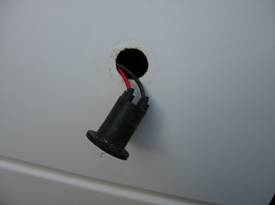
Starting with very small hole, I slowly increased the size of the hole using different bits. I ended up with a hole purposely smaller than I needed, so that I could more carefully control the size, to avoid the worst case scenario: ending up with a hole too big. I filed the smaller hole slightly larger, a little at a time, to the proper size using drill-bit type file. This was a lot quicker and consistent than doing it manually.
After many trial fits of inserting the light, I was happy with the snug fit. The lights' housing is made of soft rubber, and it is the tight fit between the rubber and the hole in the fender that actually secures the light in place. I found that you need to insert the rubber base of the light into the hole without the plastic lens, and then insert the lens into the rubber base after the base is in the vehicle's hole. The plastic lens actually tightens the fit a little, so you have a bit of security if your hole is just a tad bigger than you wanted.
When I was happy with the size of the hole, I painted the bare edge of the hole with some touch-up paint I had on hand, although nail polish in the approximate color of your car will do fine. If you're careful with the drilling you should not see any of the microscopic chips of paint around the hole, once the light is in place. There is an approximately 5mm lip of rubber around the light to mask any imperfections. The paint is just to prevent future rust.
Connecting and Running the Wires
I purchased a small spool of 16 gauge auto wire, and ran two wires from each turn repeater, to my existing turn signal lights on my front fender of each side. Each light comes with two wires molded into it, about 5" in length. Soldering is your best option when connecting your wires, but in my haste to finish, I twisted the wires carefully together and tightly wrapped the connection in electrical tape. Essentially you need to extend the two 5" wires to reach your front turn signals on each side. Remove the front turn signal housing using the two Phillips screws to gain access to the wires. The Miata turn signal housing has three wires going into it: Parking light, Turn Signal, and Ground. One of the wires needs to go to the green (on my car) turn power feed, and the other to the black ground wire. It does not matter to which of the two wires go, just that they are connected to the turn power and the ground. I could have possibly chosen to ground the lights on any metal point in the car, as opposed to tying in with the same ground wire that the front turn light shares. However, I wasn't taking any chances. I felt that it may have disturbed the sensitive nature of the turn signal flashers.
I found that it was easy to snake the wires above the wheel well, by simply removing a few screws in the wheel well splash guard above the tire.
I love my new side mounted turn lights: They are bright, safe, look good, and were cheap and easy to install.
A note on turning the front side markers into turn signals. On my 2000 LS, there was a pesky zip tie binding the side marker wires to the fog light wires. To pull the side marker wires up into the engine compartment, I had to use a long side cutting nipper to cut that zip tie. Rather tricky, but for somebody with medium/thin hands, easy, with patience.
I also had a rapid flash on my right side lamps after doing the modification, and thought I had done something wrong. I found that if I removed the headlight cluster turn signal bulb, tweaked the contact points in the socket, and put the bulb back in, the rapid flash went away. It is the same rapid flash you get if you completely remove the front turn signal/driving light bulb. So before you doubt your new connections, check to make sure that the headlight cluster turn signal bulb is seated properly.
| Back to the Garage |
5 December, 2004 |