Custom
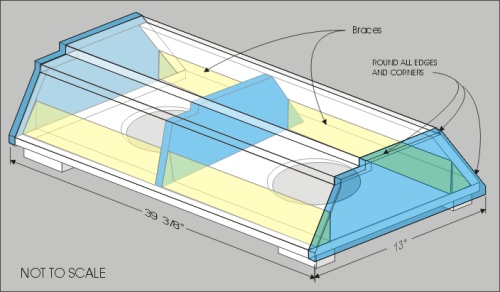
Subwoofer This was by far the most fun of any of the Mods I've done to date, as it entailed building a custom box to fit on the rear deck, which houses 2 Rockord Fosgate punch 8" subs (requiring a minimum of 3 cu. ft. space each). I tried countless ways of designing a box with the most cu. ft, hoping to port it (which just didn't happen). There is room beneath the rear deck on each side, but by the time you fit the 'walls' of your box in those spaces, you wind up with not much room at all, and a box which is not very structurally sound. I thought about creating a custom fiberglass enclosure to solve that problem, but after reading about vibration & bracing concerns associated with fiberglass enclosures, I chose to build the box to fit on top of the decklid, from 1/2" MDF. The box weighs about 20 lbs with the subs in it, and is very sturdy due to the bracing. The top folds down (with the box in place) rather snug. I rounded the back edges and back corners of the box as much as possible (By sanding with 60 grit sandpaper), avoiding any tearing or denting of the plastic window. You cannot put the tonneau cover on with the box installed. The window folds up and over the box (Which is slanted at both front and back) and does not crease, dent or fold. I recommend folding (or 'pushing') the window down and back into the rear package tray recess after unzipping it, but before lowering the top. This will insure that the window portion of the top doesn't 'stretch' over the corners of the box as the top is lowered. The box has a 'stair step' in it, allowing the cross bar/brace to tuck neatly and hold down the box. Initially I had built the box without this recess, but later I went back and cut one in because the brace was putting too much pressure on the box. I did not add any polyfill to the interior of the box, as it did not give me the punch at low end bass I expected. The best part: The bass is awesome. I run my system with just about half front/half rear fading, and the car booms enough to give me great bass at any volume! While I don't listen to much rap, this box could certainly handle it. But don't expect to thump your neighbors! This box is only .65 cubic ft total, so your not going to be blasting a 12" sub with 300 watts through it. I'm not sure how th ebox would hold up to a large single subwoofer, since elimination of the center brace would make the box less sturdy. |
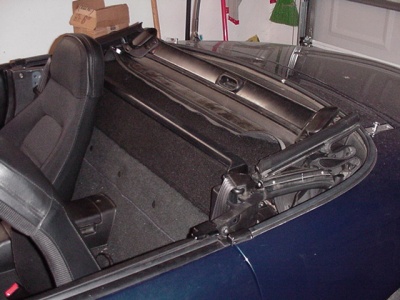
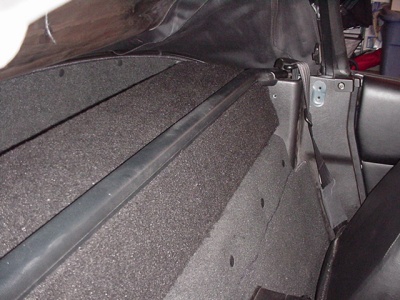
The worst part: I originally built this box as a trapezoid with no stair step in it. I went back and cut my stairstep into the finished box, as I wasn't happy with how tight the crossbar was on top of the box. While you could probably tork down on the crossbar alot, I opted to cut away the rubber surround on the crossbar to give me a little more room. I found that I could not get the crossbar seated all the way without the box cracking and popping, so I trimmed away the bottom 1/3rd or so of the rubber surround on the crossbar using a utility knife on each side, and then prying/peeling the rubber up. The bar inside is round and not flat like I had hoped, but it did give me another 1/4" or so of height to squeeze the box into. After all was said and done, I noticed that on a buddies 93 M edition he didn't have a crossbar at all... Kinda makes me wish I had just removed the thing and just left the box a trapezoid instead. Too late now though. You also can no longer make much use of the rear decklid for 'storage'. No biggie here though, as I never used it much to begin with. I also originally built this box 14" deep. After 3 months I noticed some minor wear on my soft top at the seam nearest the window. I've been recommending 13" depth instead, which apparantly allows for the top to seat all the way down properly, and helps to eliminate any soft top wear. |
Nitty Gritty: Hows it sound? Pretty darn good. It'd probably sound better if I had more cu. ft. to work with, but the bass is a nice addition to the sound stage. Because it is down firing, the bass is not dramatically delivered behind you. It sort of resonates around you, while being just mildly aware that it is behind you. I think the headrest speakers (highs) help balance the bass out a bit also. The rockford's I used are ok, but really bottom line subs that tend to sound a bit flat at low Hz. I didn't want to blow alot of money on subs if the box didn't work well, so I may upgrade in the future. Most subs (even the small 8") have a pretty deep top mount depth, so I would check that before you decide on purchasing, especially if you want to keep the cross bar brace.
Subwoofer
Plans PLANS
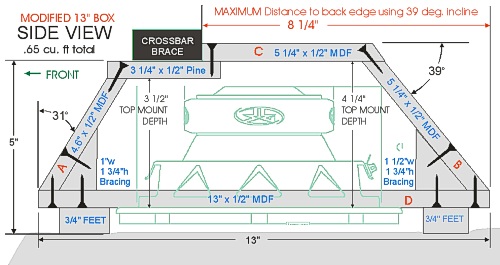
CHANGED AS OF 7/17/2002 Materials: Dimensions - The box should not be longer than 39 3/8", wider than 13" and taller than 5" at the top of the stairstep (To fit under the crossbar brace). Once assembled and carpeted, it will be a tight squeeze between the seatbelt posts. Note that you will need to remove the rearmost tonneau snap bolts in both of the seat belt post covers in order to install the box. If you do not want to remove these bolts, you will need to measure between the 2 bolts and subtract 1/8" or more from the total length available. Mounting - I did NOT bolt or otherwise screw the box into the rear deck in any way. It is sandwiched between the seatbelt posts, and the cross brace pins it down into position in the 'Stairstep' located at the front of the box top. I do plan to attach the box to the car somehow in the future. If and When I find a way to do it, I will post the information here. Cubic ft. - It is important to note that the box shown above, will give you roughly .325 cubic ft in each side (or .65 cubic ft total), which doesn't include speaker displacement (the Rockfords I put in were .02 cu.ft. each) but does include internal bracing. Be sure to use a subwoofer which can be used in this small space. You could opt for a larger single subwoofer (Providing it will fit) and then have .6 cubic ft to work with, but you'll need to consider putting braces (pehaps like the center brace but with a large hole cut in it) on either side of the single sub. This will help eliminate any flexing in the box. Remember, it's only 1/2" mdf. Feet - I recommend using 3/4" rubber material ( at each corner and in the center to keep the box raised and allow the sound to eminate from the bottom of the box without getting muffled in the carpet. Any smaller (Than the 3/4" height) and the subwoofer faces will be pressed into the carpeting on the rear deck. I used furniture 'cups' originally intended for use on furniture feet/floor protectors, which I found to be 3/4" height and constructed of rubber. Rear Deck - The rear deck has a layer of rubber and insulation padding underneath the carpet. You can always remove these if desired, to give you a little more height to work with. But I preferred to leave the padding and rubber in to help eliminate any rattles. I swapped my insulation with 8 lb. carpet padding & I also added some foam insulation strips underneath and around the bolts which hold down the aluminum deck cover to eliminate any rattles. Use Some Pine - I would recommend using pine (or some other wood besides mdf) for your bracing, and 'stair step' piece (And possibly even the endpieces even though I didn't) as the screws will hold better and not strip out when screwing all the pieces together. Round the Corners - Round down all of your corners and edges as much as possible (Power sander works well) at each end of the box to help avoid any sharp corners against your soft top. Please do not email me asking for directions on how to build this box. There is plenty of information here for an adequate woodworker to understand and use to build their own. If you cannot determine how to build the box from the information given here, then hand the design over to someone who does. |
RECOMMEND GOING WITH 13" WIDTH (Instead of 14" as previously designed) as some minor wear appeared on my soft top with the 14" box after about 4 months of use. I've test- fitted this new design (By temporarily positioning my current box forward) which seems to solve the problem quite well, allowing the top to now lower completely. The front and rear angles of the box are different. 31 degree cuts for the front, to match the 59 degree incline of the rear 'firewall' leading up to the decklid, and 39 degree cuts for the back, to get the most angle you can while trying to keep within the .3 cubic ft limit, and allow the window to fold over it. Putting it all together - wasn't as bad as I had originally thought. Though countersinking all the screws was a painstaking experience. I started with the top of the box (Piece C), screwing and glueing each endpiece onto it. Then I worked my way around all sides and braces, except for the bottom face (Piece D) which I temporarily screwed into place but didn't glue. I then strap clamped everything and let it sit overnight. The following day, I removed the face to silicone all the cracks and crevices, & test fitted. Once I got my speaker leads and everything in place, I then glued the bottom piece on using construction adhesive and screwed it into the bracing. Silicon - Your friend and mine. I used ALOT of it. I goopuckeyed every seam and crack I could get to to ensure the box was airtight. The carpet - (Black carpet from crutchfield) was applied using some spray adhesive and staples. I first attached the side pieces of carpet, and then 'wrapped' a piece of carpet from the back bottom, and over the top to the front bottom. I stapled the carpet to the box on the bottom face because, noone will ever see that side anyways. The wiring was then ran underneath the box to the passenger side of the rear deck, under the rear deck carpet and through an existing triangular opening into the trunk. Installation - The easiest way to install it is to first remove the cross bar brace, and then slide the box into position (With the canvas top raised). Then lower the canvas top and put the crossbar brace back on while keeping the box forward & 'snug' up against the brace when tightening the hold down bolts. If you make your own box based on this design, let me know about it. I'm sure plenty of people out there could come up with some pretty good modifications to this design. I originally built this box as 14" deep, but noticed some minor wear on the vertical seam (nearest the window) after about 3 months. I had been recommending 13" depth to anyone inquiring about the box, and have since updated my plans to reflect this change. DISCLAIMER:
I created this box on April 13, 2002. The rear plexi window seems to be
holding up well, and doesn't appear to be affected by the box, but only
time will tell. As of July 17, I had noticed some
minor wear on the vertical seam (nearest the window) on the soft top.
I recommend building the box at 13" in width, instead of 14"
to help eliminate this risk. Current Illustrations/plans reflect this
change. |
My homepage shocasing my other stereo mods.
Back to the Miata.net Garage |
19 July, 2002 |