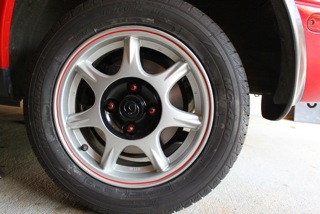

4/2013 - Just picked up a 1997 MX-5. I had previously owned a 1990 that I had stripped down and built in to a rather good race/track day car. The 1997 is looking a little drab so I am starting this project working from the ground up. The plan is for it to be a track day worthy street car. Tires appear to be Costco crap but since they are brand new Costco crap they will be pushed to the end of the list for now. In the last few weeks I have done brakes (new calipers, Brembo rotors and Green Stuff pads), cam cover gasket, plugs, wires, oil change, diff oil change, seat conditioning, out of car rug bath, rug jute replacement, sound insulation, polish, wax and the wheels.
The Wheels

Supplies:
I found the Dremel tip and a bag of 30 polishing points on Amazon.com direct from China for about $6. I do not see these at the Dremel rack at Lowe's anymore.
DO NOT BUY the Mother's polishing "cone" it is not very good for this project so a waste of about $25.
Optional:
Start with giving the wheels (rims) the best bath you can both front and back too! Use a good stiff brush and go over everything a few times. Use the Super Clean since this stuff kicks butt!
I chose to go from macro to micro on this project by starting with the full size ball and hitting the entire wheel with polish. Concerning polish - a little bit does go quite a long way. The little tiny jar of Mother's polish lasted through all four wheels and through three plus steps.
First I covered the entire wheel in polish being quite liberal with it. Then with the full-size ball in the cordless drill I got as much of the wheel as I could. This was probably about 45 minutes of work to do all four.
Then I wiped everything down and spread another slightly lighter layer of polish over the entire wheel and hit it with the mini-ball which got almost everything but the deepest corners. This was probably about another 45 minutes work to do all four.
Then I moved on to the Dremel and the polishing cones. These are strong enough to really get in to the corners and get out the set-in grime. Be careful since I did, well, burn through the finish in two inconspicuous places (Doh!). This was probably about an hour and half to two hours of work for all four. 7 "spokes" makes 14 corners X 4 wheels for 56 spots that you need to get in and work at.
Overall results were nothing short of excellent!
As to further customization (painting etc.) obviously that is up to you.
The black centers I did using blue painters tape to mask and a razor blade to cut out the center. I also made a cardboard template to cover the rest of the wheel. I did NAPA self-etching primer and followed with a high-temp gloss black spray paint.
I am happy with the red pinstripe but not overjoyed. I may find that I will be doing it over to get slightly better or more consistent lines - or maybe not... I did hit the wheel with plenty of Decal-Prep before running the stripe and adhesion is excellent.
The red lug nuts that I got through Amazon were cheap and it shows. They are more pink than red and they already show signs of wear after being on and off the car once. They are better than what was on there but I just couldn't get past $100+ for new nice chrome lug nuts! You live and learn...
| Back to Product Reviews |
30 June, 2013 |
| [Home] - [FAQ] - [Search] - [Sponsors] - [Forums] |
| [Garage] - [Clubs] - [Contact Us] - [Disclosures] - [More...] |
Copyright
©1994-2024, Eunos Communications LLC
|